HOW I PHOTOGRAPHED IT: NATIVE MAGAZINE COCKTAIL OF THE MONTH THE FOX BAR AND COCKTAIL CLUB's CHERRIES ETC.
The Fox Bar and Cocktail Club.

The Cherries Etc.
The Native Magazine Cocktail of the Month is one of my favorite reoccurring jobs that I photograph. Native always sends me to incredible bars and restaurants to photograph delicious cocktails. I get to meet exceptional people along the way and take remarkable pictures. Let us dive into this cocktail. The Cherries Etc. created by and styled by Nick Dolan the Head Bartender of The Fox Bar and Cocktail Club. It features Lustau Brandy, Cappelletti red bitters, lemon stock, Maurin Quina, absinthe, Scrappy's Chocolate Bitters, and 3 fresh Cherries. To see the recipe in full be sure to pick up Native! Keep reading to see how I created this beautiful cocktail photo.
My Thought Process
My thought process for taking this image is simple. I want to make the cocktail look epic. When I first enter a bar to photograph a cocktail I want to know what the cocktail is going to look like. If they have a picture even better.
I need to know the type of glass, the color of the drink, and if there is any garnish. These factors will let me determine where and how to photograph the drink.
If I'm photographing an old-fashioned I'm going to try to avoid photographing it on a brown wooden table because it will blend in. I'm trying to get as much detail about the drink as I can. So that I can avoid setting up multiple times or having to waste time once the drink is made. Drinks look good for 5 min window before the ice melts and the drink gets too diluted and starts to separate. Often we will make multiple drinks, but I try to keep it to a minimum because it is costing the bar money.
So the above questions helped me figure out what the drink I'm photographing is and gave me an idea where to photograph the drink. My go-to locations are window seats, and bars. They both provide a lot of useful options. In Nashville, the bars themselves have gotten really unique, with lots of cool textures and details. Let me know where you like to photograph cocktails in the comments!
Now that I have a location picked and have an idea of the drink looks like the next thing I think about is lighting. I have a few lighting diagrams that I use on a regular basis for beverage photography and I'm also constantly altering them as well. My lighting is always evolving. Below is the lighting diagram that I used for this shot.
My Lighting Diagram

A Three Light Set Up
For this image, I used a 3 light setup. It looks complicated, but once you have set it up a few times it becomes second nature. I'm looking to create a crisp full-length highlight down the left side of the cocktail, a nice glow in the cocktail's liquid, and a background that is bright enough to put text over for copy in the magazine. Let's examine the lighting diagram. this lighting diagram.
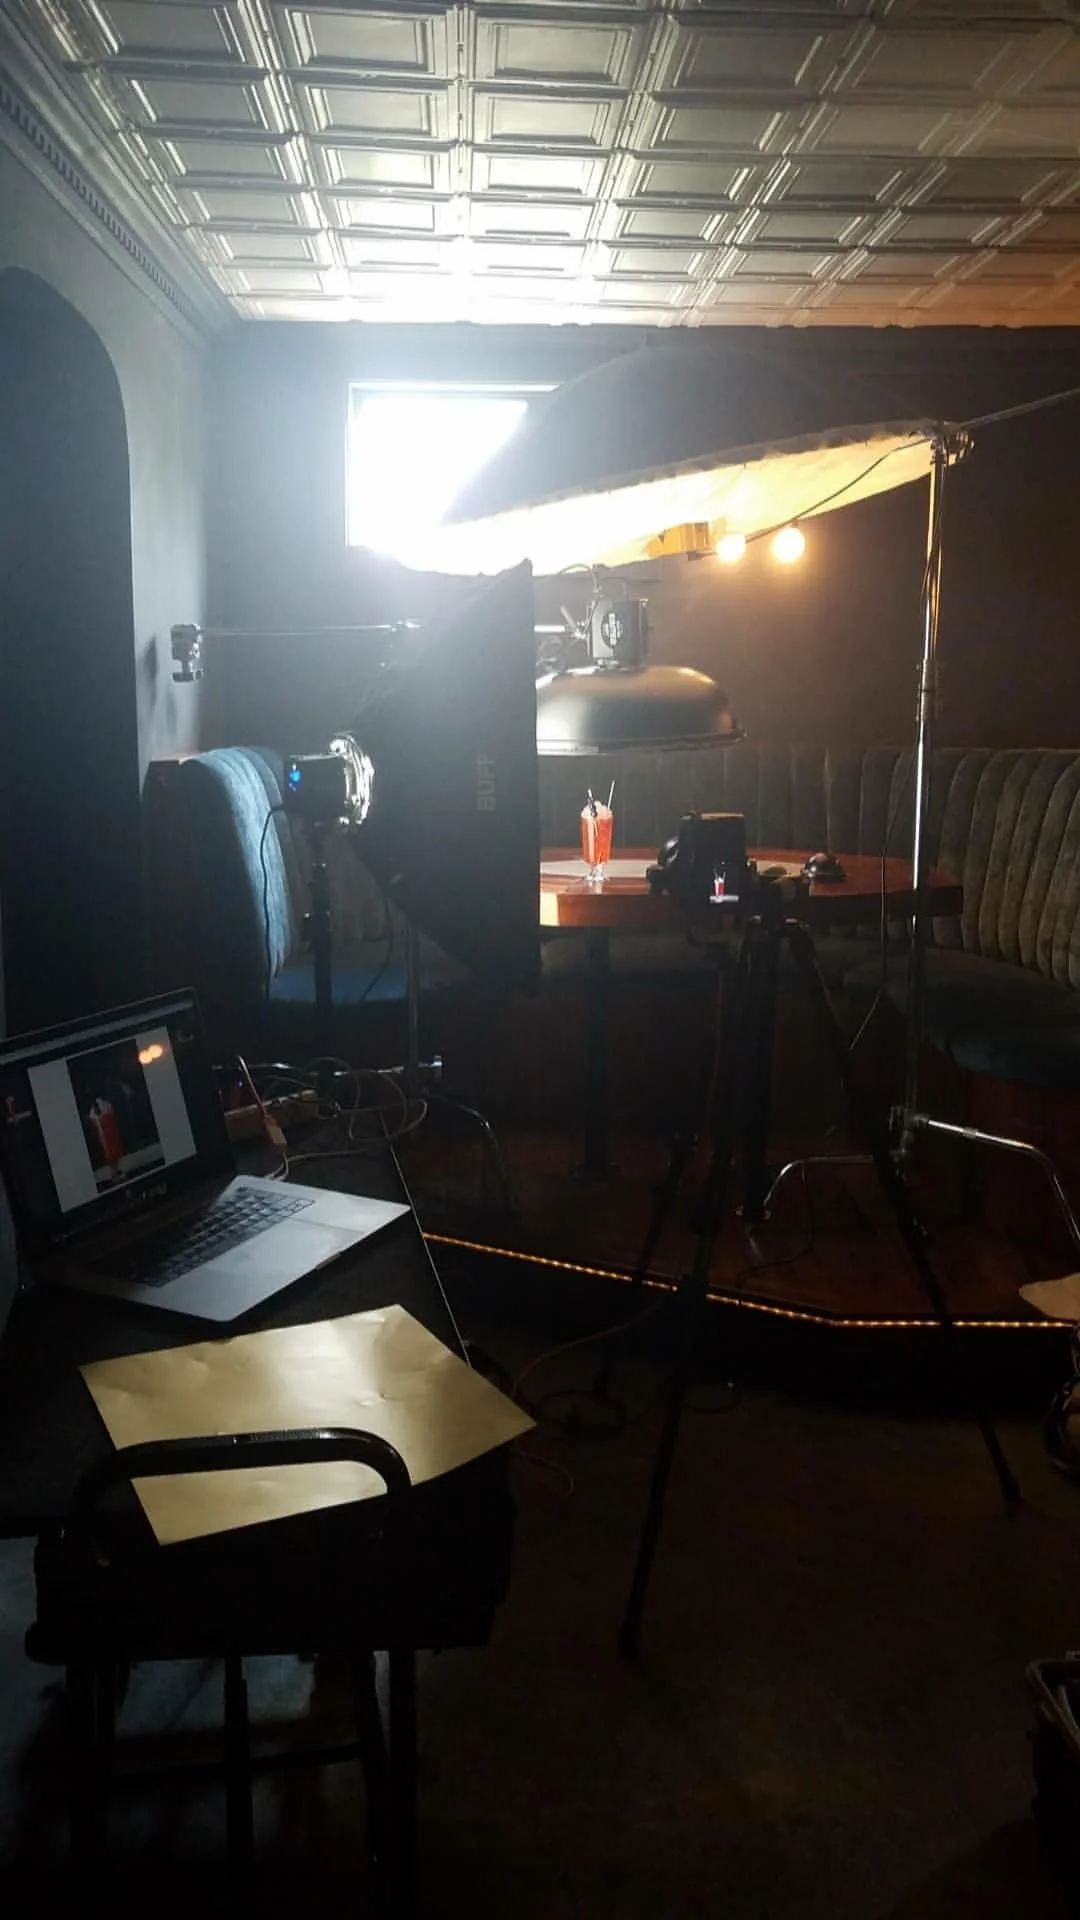
A behind the scenes photo of my setup so that you can see everything a bit better than the diagram.
The Strip Box
The light to the left of the drink is a strip box with a Paul C Buff DigiBee 800 head. This light creates a long crisp highlight that runs the length of the glass. The strip box provides separation of the glass and the beverage. It also just looks good.
The Key Light
The key light is a Paul C Buff Einstien in a beauty dish with a 30-degree grid and a polarizing gel over the top. The beauty dish is a contrasty indirect source, and the grid serves to give our light direction. The polarizing gel eliminates unwanted reflections. It is used like a polarizing filter on a camera lens.
Background and Fill Light
Behind the beauty-dish is a Paul C Buff sixty-four inch Parabolic Light Modifier with a white diffusion sock. This light is bringing up the exposure on the background so that it is bright enough and gives the drink some separation from the background. The background was a good distance from our actual working surface. This allowed the background to be out of focus and not distracting from the cocktail.
The Gold Card
Finally, I have a gold card that I positioned behind the drink to give it a glow with a smoother gradient. I carry a range of silver and gold cards and pick the one that fits the drink color best.
Wrapping Up Lighting
All right let us wrap this lighting thing up! This is a complicated lighting setup. What we are trying to achieve is pretty simple, however. I'm looking for a nice crisp highlight on the left side of the glass and good color on the beverage. The rest is just filling in the details. Let me know how you like to light beverages in the comments!
Camera Settings for Beverage Photography
Now that we know the lighting setup lets talk camera settings. This is where things seem complicated but are really easy. For most of my beverage photography, I have my camera set at f11, 1/125 sec, and ISO 100. I want to be at max sync speed so that I don't have to worry about ambient light. I choose f11 because it gives me enough depth of field that all of my drink will be in focus, and it is not so deep of an f-stop that I am getting unwanted stuff in the background in focus. I use ISO 100 because it gives me the best picture quality, there is virtually no noise in the image, and I have the most dynamic range to work with in post-production.
Camera and Lens Selection for Beverage Photography
I have several cameras and a lot of lenses to choose from. I choose the Pentax 645Z. The camera gives me a lot of flexibility in terms of dynamic range and cropping. I used the 120mm Pentax f4 Macro lens. This lens allows me to get in close and has a ton of micro contrast and is super sharp.
If you want to check out my full beverage photography kit check out the kit below!
Below is a full list of equipment that I used for the shoot! It has everything from which transmitters I use to which polarizing gels that I use. I hope you all find this useful. Let me know in the comments what type of gear you like to use for beverage photography!
Behind The Scenes Video
I don't think this post would be complete with out a little behind the scenes video. You can see the final shot on the screen in light room and see my full set up in action!
Putting It All Together
So when it comes to beverage photography things seem really complicated. If you take the time to think about what you are photographing it really is easy. A little advance planning and thinking through the setup will help you reach the top. Beverage photography is one of my favorite things to do. It allows me to really work a setup and think things through. I would love to hear about how you approach beverage photography in the comments. What works for you? Do you have a favorite setup? Do you prefer to work with or without polarizers? Tell me all about it in the comments!
Like what your reading? Go ahead and sign up for my e-mail list to find out about my latest blog post, specials, and workshops. Want to follow along daily click on over and follow me on instagram www.instagram.com/bumgardnerphoto
Nick Bumgardner is a commercial beverage photographer based out of Nashville, TN.